My Own Mediator for .NET (Dom.Mediator)
Lightweight mediator with pipelines and built-in Result pattern

With over ten years of experience in the full software development lifecycle, I specialize in scalable and high-performance cloud architectures, delivering solutions that go beyond simple programming. As co-founder and Senior Architect at Cloud Ninja, I am committed to innovation and to building cloud infrastructures that optimize business and simplify operations. Leveraging the latest Microsoft and Azure technologies, I design and implement solutions that are flexible, secure, and future-ready, always ensuring the best possible outcome to help clients’ businesses grow.
Introduction
The Mediator pattern is a common architectural approach used to reduce coupling and to structure application logic around explicit requests and handlers. It helps keep orchestration separate from business logic and makes systems easier to reason about and test.
Over time, I’ve used existing mediator libraries, most notably MediatR. They work extremely well, but in some scenarios I found myself wanting something more lightweight and explicit, with a small surface area and no hidden behaviours. At the same time, the ecosystem itself is evolving: some widely used libraries as MediatR, are introducing commercial licencing, while modern AI-assisted development significantly lowers the cost of building and validating small, focused frameworks from scratch.
That combination of practical needs and curiosity led me to build my own mediator. In this implementation, I also integrated the Result pattern directly into the core abstractions. This adds an additional pillar to a Clean Architecture approach by ensuring that every interaction has an explicit success/failure contract, rather than relying on exceptions for control flow. In this post, I’ll briefly revisit what the Mediator pattern is, explain how the Result pattern is baked into the core interfaces, and show how to use it in practice.
What the Mediator Pattern Is
The Problem
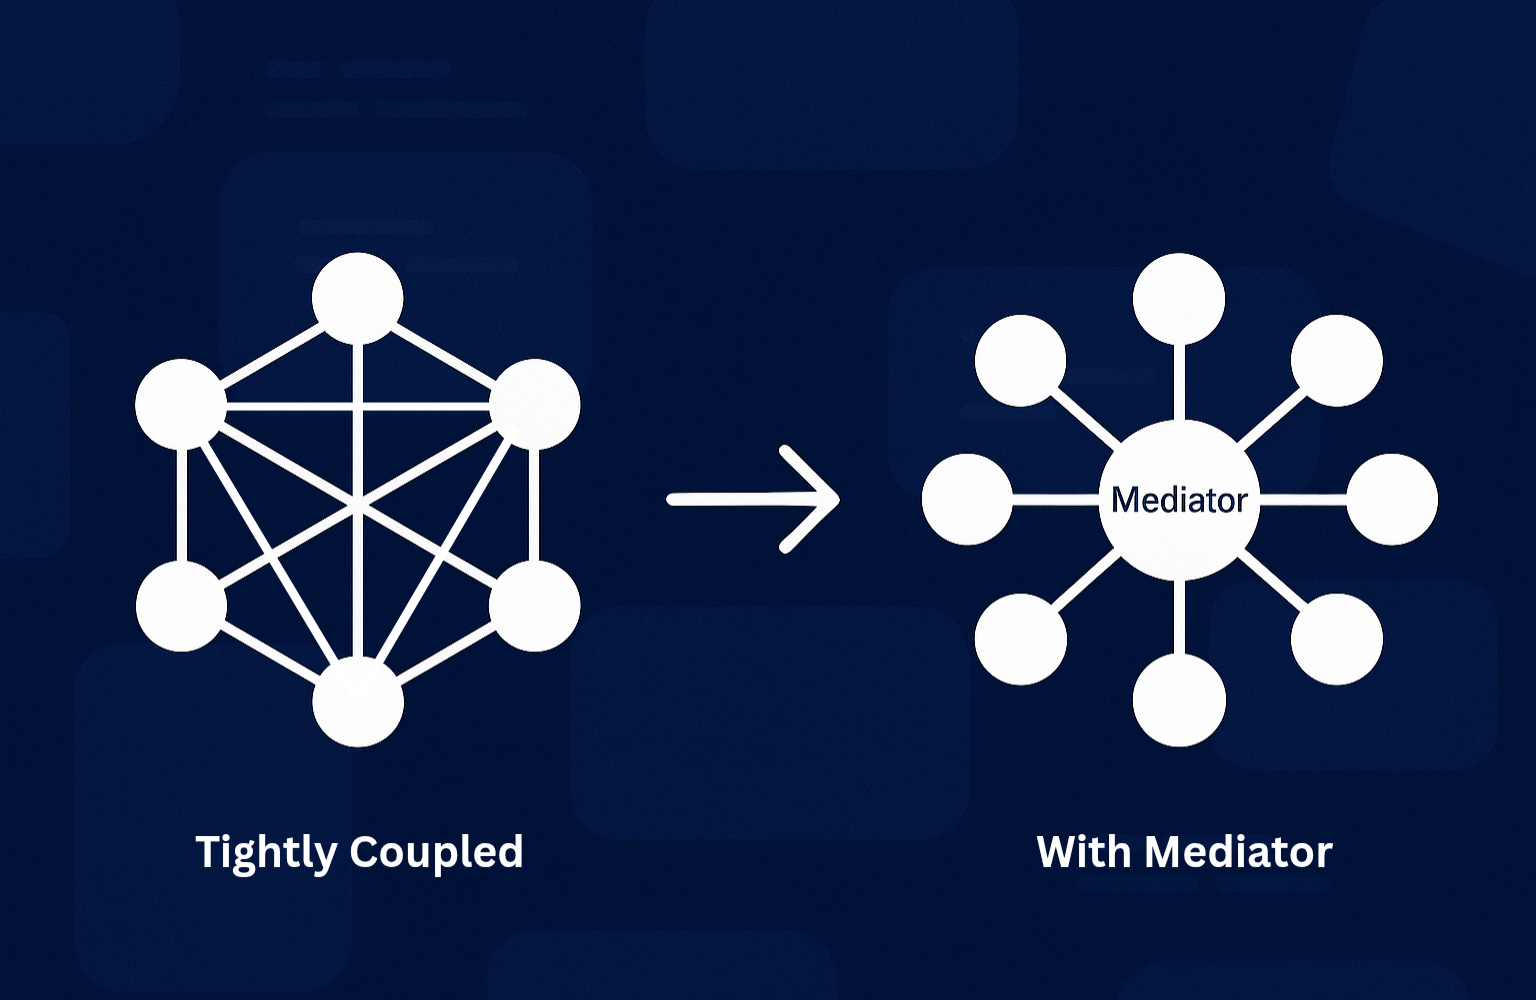
At its core, the Mediator pattern addresses a common problem in software design: managing interactions between multiple components without creating tight coupling.
When objects communicate directly, they gradually accumulate knowledge about each other, leading to rigid dependency graphs where even small changes require touching multiple classes. This makes systems harder to evolve, test, and reason about.
The Solution
The Mediator pattern solves this by introducing a dedicated component responsible for coordinating interactions. Instead of calling each other directly, components delegate coordination to a mediator and only depend on it, not on their peers.
By centralizing interaction logic, components can change independently and focus on their own responsibilities. In modern application architectures, this often takes the form of explicit requests and handlers, with the mediator acting as a dispatcher rather than a domain object.
Mediator Architecture
The diagram below shows the complete architecture we achieve when using Dom.Mediator. Here's what happens at each stage:
- API Request arrives and is routed based on the Request Type(Query or a Command as given by the implemented interfaces)
- Pipeline Behaviours intercept the request:
- Logging (request details)
- Validation (FluentValidation checks, see example below)
- Authorization
- Metrics/Telemetry
- Any custom cross-cutting concerns
- If validation fails, the behaviour short-circuits and returns a
Result.Failure()without reaching the handler - If validation passes, the request proceeds to the handler
- Query path: Direct database read, returns data
- Command path: Interacts with the Domain Model for business logic, then persists state via Repositories
- Result (success or failure) flows back through the API response

Blue elements represent the framework infrastructure (given by request types, mediator and pipeline behaviours), while red elements highlight the Core Application/Domain logic (handlers, domain models and business rules).
In the remaining sections we will walk though the key steps required to cover the overall program setup and how we use each ingredient. The elements presented are extracted from the full working example that you can clone from github: Dom.Mediator.Samples.MinimalApi
How to Use Dom.Mediator
Start by installing the NuGet package:
dotnet add package Dom.Mediator
Or search and install via NuGet.org: Dom.Mediator
Request definition
As a first step we need to define the Request Type that represents our command or query implementing the specific interface that states the intent (ICommand or IQuery).
Dom.Mediator supports three request types:
1) Command with no return value (fire-and-forget):
public record UpdateTaskCommand(
    string Id,
    string Comment,
    Status? Status) : ICommand;
2) Command with a return value (e.g., returns the created Task Id):
public record CreateTaskCommand(
    string Title,
    string Description,
    DateTime? DueDate) : ICommand<string>;
3) Query (read operations with return values):
public record GetTasks() : IQuery<List<TaskItem>>;
Note: When defining Command or Query types, you only specify the domain return type (if any) while the mediator framework handles the Result pattern and async execution behind the scenes. However, when implementing handlers, you'll work directly with
Task<Result>orTask<Result<T>>return types. This design keeps request definitions clean and focused on domain intent, while ensuring handlers have full control over success/failure outcomes and asynchronous execution.
Handler implementation
Implement the handler for each request type, keeping it focused on the business action/read.
Handler for ICommand (no return) In this example, the handler manages an update operation on a Task item that is expected to already exist in the system.
For this type of operation two outcomes are possible:
Success: the Task is successfully updated according to the incoming request
Failure: the operation does not complete successfully, and the reason for the failure is reported
This is a good example of a pure Command: it does not return any domain data, but only the execution status of the operation itself.
public class UpdateTaskHandler : ICommandHandler<UpdateTaskCommand>
{
    private readonly TaskRepository _store;

    public UpdateTaskHandler(TaskRepository store) => _store = store;

    public async Task<Result> Handle(UpdateTaskCommand request, CancellationToken cancellationToken)
    {
        var task = _store.Tasks.SingleOrDefault(x => x.Id == request.Id);

        if (task is null)
        {
            Error error = new Error(
                TaskItem.ErrorCodes.UPDATE_TASK_NOT_FOUND,
                $"Task not found for id: {request.Id}",
                TaskItem.ErrorTypes.NOT_FOUND);

            return Result.Failure(error);
        }

        if (request.Status.HasValue)
        {
            var statusChange = task.ChangeStatus(request.Status.Value, request.Comment);

            if (statusChange.IsFailure)
            {
                return statusChange;
            }
        }

        task.AddComment(request.Comment);

        return Result.Success();
    }
}
Handler for ICommand (returns value) In this example, the handler manages a create operation for a Task item that does not yet exist in the system. Unlike an update operation, creation introduces a new entity and therefore produces new information that the caller cannot already know.
Also for this type of operation two outcomes are possible:
Success: the Task is successfully created, and the newly generated Task Id is returned.
Failure: the operation does not complete successfully, and the reason for the failure is reported.
Although this is still a Command, because it performs a state-changing action, it is not a pure command. The returned Task Id is a necessary part of the workflow, enabling the caller to reference the newly created entity in subsequent operations.
public class CreateTaskHandler : ICommandHandler<CreateTaskCommand, string>
{
    private readonly TaskRepository _taskRepository;

    public CreateTaskHandler(TaskRepository taskRepository) => _taskRepository = taskRepository;

    public async Task<Result<string>> Handle(CreateTaskCommand request, CancellationToken cancellationToken)
    {
        var createTask = TaskItem.Create(request.Title, request.Description, request.DueDate);

        if(createTask.IsFailure)
        {
            return Result<string>.Failure(createTask.Error!);
        }

        var task = createTask.Value!;

        _taskRepository.Tasks.Add(task);

        return Result<string>.Success(task.Id);
    }
}
Handler for IQuery (read operations) In this example, the handler manages a read-only retrieval operation that returns a list of Task items. The purpose of this handler is to query the system state without causing any side effects or modifications to the underlying data.
Also for this type of operation the possible outcomes are again:
- Success: the requested list of Tasks is retrieved and returned.
- Failure: the retrieval operation fails, and the reason for the failure is reported.
This handler is a clear example of a Query: it does not change system state and its sole responsibility is to return data that represents the current state of the system.
public class GetTasksHandler : IQueryHandler<GetTasks, List<TaskItem>>
{
    private readonly ITaskRepository _taskRepository;

    public async Task<Result<List<TaskItem>>> Handle(GetTasks query, CancellationToken cancellationToken)
    {
        var tasks = await _taskRepository.GetAllAsync();
        return Result<List<TaskItem>>.Success(tasks);
    }
}
Result pattern
Dom.Mediator is Result-first: handlers return Result or Result<T> instead of throwing for control flow. That keeps success/failure explicit at the call site and makes error handling predictable.
Key points:
- Success paths return
Result.Success()orResult<T>.Success(value). - Failures return
Result.Failure(code, message)(or similar) so callers can branch without exceptions. - Behaviours can short-circuit by returning a failure
Result, preventing handler execution when validation/logging/authorization fails.
Example of a validation failure:
public class CreateTaskHandler : ICommandHandler<CreateTask>
{
    public Task<Result> Handle(CreateTask command, CancellationToken ct)
    {
        if (string.IsNullOrWhiteSpace(command.Title))
            return Task.FromResult(Result.Failure("title_required", "Title is required."));

        // Use Case Logic...

        return Task.FromResult(Result.Success());
    }
}
Registration and Usage
Step 1: Register the mediator in your DI container
Use .AddMediator() to configure Dom.Mediator in your dependency injection setup. This involves two key steps:
- Auto-register handlers: Call
config.RegisterHandlers()with your assembly, it will scan for allICommandHandlerandIQueryHandlerimplementations and register them automatically. - Register behaviours: Call
config.AddBehaviour()for each cross-cutting concern (logging, validation, etc.). Behaviours wrap every request/command execution, enabling pipeline processing (explained in the next section).
builder.Services.AddMediator(config =>
{
    // Auto-register all command and query handlers from the specified assembly
    config.RegisterHandlers(typeof(Program).Assembly);

    // Register pipeline behaviours that will intercept all requests
    config.AddBehaviour(typeof(LoggingBehaviour<,>));
    config.AddBehaviour(typeof(FluentValidationBehaviour<,>));
});
Step 2: Use the mediator in your endpoints
Inject IMediator into your API endpoints and call .Send() with your command or query. The mediator routes the request through registered behaviours to the appropriate handler and returns the result:
app.MapPost("/tasks", async (CreateTaskCommand cmd, IMediator mediator, CancellationToken ct) =>
{
    var result = await mediator.Send(cmd, ct);
    return result.IsSuccess
        ? Results.Created("/tasks", null)
        : Results.BadRequest(result.Errors);
});
Behaviours
Behaviours are middleware that intercept requests before they reach handlers and potentially further process the result of the handler. They enable cross-cutting concerns like logging, validation, metrics, retry logic, and error handling all without cluttering handler code. Dom.Mediator supports unified behaviour definitions with automatic arity detection.
One of my favorite use cases for behaviours is inbound request validation. By applying validation at the behaviour level, we can enforce a centralized and consistent validation strategy while keeping handlers focused purely on business logic. This approach becomes especially powerful when integrating FluentValidation into the behaviour pipeline, enabling robust validation with minimal friction and zero duplication.
Let's see how we integrate this use case in the CreateTask Command previously introduced.
CreateTaskCommandValidator To validate inbound requests, we define a FluentValidation validator associated with the command’s request type. This validator is responsible for declaring all the rules that must be satisfied before the command reaches its handler.
Each rule focuses on a single aspect of the request, making the validation logic explicit, composable, and easy to maintain:
public sealed class CreateTaskCommandValidator : AbstractValidator<CreateTaskCommand>
{
    public CreateTaskCommandValidator()
    {
        RuleFor(x => x.Title)
            .NotEmpty()
            .WithMessage($"{nameof(CreateTaskCommand.Title).ToLower()} is required.");

        RuleFor(x => x.Description)
            .NotEmpty()
            .WithMessage($"{nameof(CreateTaskCommand.Description).ToLower()} is required.");

    }
}
By isolating validation concerns in a dedicated validator, we keep the command handler free from defensive checks and ensure that only valid requests are allowed to enter the execution pipeline. When combined with mediator behaviours, this approach enables a clean, centralized, and reusable validation strategy across the entire application.
Note: the above Validator is just a very simple example of how we integrate a FluentValidation rule into our solution, the library itself is a lot more powerful and can cover pretty much any use case. For full reference you can consult the official documentation here: FluentValidation
Validation Behaviour Definition
We then define our behaviour logic by implementing the Dom.Mediator framework interface, in this case for a Request/Response Command:
public class FluentValidationBehaviour<TRequest, TResponse> : IPipelineBehaviour<TRequest, TResponse>
    where TRequest : IRequest<TResponse>
{
    private readonly IEnumerable<IValidator<TRequest>> _validators;

    public FluentValidationBehaviour(IEnumerable<IValidator<TRequest>> validators)
    {
        _validators = validators;
    }

    public async Task<Result<TResponse>> Handle(TRequest request, CancellationToken cancellationToken, RequestHandlerDelegate<TResponse> next)
    {
        if (!_validators.Any())
        {
            return await next();
        }

        var context = new ValidationContext<TRequest>(request);

        var validationResults = await Task.WhenAll(
            _validators.Select(v => v.ValidateAsync(context, cancellationToken)));

        var failures = validationResults
            .SelectMany(r => r.Errors)
            .Where(f => f != null);

        if (failures.Count() > 0)
        {
            Error error = new("ValidationError", "One or more validation errors occurred.", "Validation");

            foreach (var failure in failures)
            {
                error.AddDetail(failure.PropertyName, $"{failure.ErrorCode}:{failure.ErrorMessage}");
            }

            return Result.Failure(error);
        }
        else
        {
            return await next();
        }
    }
}
Key Points:
- Skips validation if no validators are registered
- Runs all validators in parallel on the incoming request
- Aggregates validation failures from all validators
- Short-circuits by returning
Result.Failure()immediately if errors exist, preventing handler execution - Proceeds to handler if validation passes
By validating at the behaviour level, handlers remain focused purely on business logic and never see invalid requests.
Register the behaviour in Program.cs:
builder.Services.AddMediator(config =>
{
    config.RegisterHandlers(typeof(Program).Assembly);
    config.AddBehaviour(typeof(FluentValidationBehaviour<,>));
});
Conclusions
The Mediator pattern offers a simple and effective way to decouple components by centralizing how they interact. In this post, we revisited the problem it addresses, the reasons that led me to build a custom implementation, and how such a mediator can be used in practice.
Building your own mediator isn’t about replacing existing libraries, but about understanding the pattern more deeply and shaping it around concrete architectural needs. In contexts where simplicity, explicitness, and a minimal surface area matter, a lightweight mediator can be easier to reason about and evolve over time.
The source code of the mediator discussed in this post is available on GitHub at Dom.Mediator; on the same repo you will also find a complete Minimal API reference implementation to get you started: Dom.Mediator.Samples.MinimalApi. Feel free to explore, adapt, or use them as a starting point to get the grasp of this powerful pattern.